Lab 1
In this lab we’re going to work in groups of 2 or (in a few cases) 3, getting some hands-on experience with the DrRacket programming environment and exploring both the Racket language and the DrRacket environment. Before you can do that, though, you’ll also need to learn a few things about using our computer science lab, so we’ll start by getting you set up on our gear.
Getting set up in our lab
While the “programming” part of the lab will be done in groups, we need everyone to do some of the initial setup. In particular everyone should be given a chance to login and change their password before groups get started on the lab exercises.
Before you can start on the lab, everyone needs to log in to a lab computer and change your password. Because there are more people than computers, groups will need to let everyone on a team take turns doing this part. It’s important that everyone get through this part, so be patient and help each other out.
Log in
To log in you’ll need a user name and a password:
- Your user name in our lab
is the same as your usual university login name, so use the same user
name you would use to log in to the unversity systems like e-mail and
Canvas. (Note that this doesn’t include the
@morris.umn.edupart.) - Your initial password will follow a scheme described in class, and you’ll then change that as described below.
REMEMBER TO LOGOUT!
When you are done with your work at the end of the lab session (or just after changing your password), don’t forget to log out! Click on the “power” button in the upper-right corner of your main monitor, then on the triangle by your name, then select “log out”. If you don’t log out, your account will be accessible to others and you may also have problems when you later try to log in to another machine in the lab.
Find some key programs
Once you’re logged in, you’ll want to find three important programs that we’ll use all semester long:
- A
terminal(it serves as a command prompt) - DrRacket
- A web browser; we have both Chrome and Firefox installed, and either should work fine.
To find one of these programs press the “Windows” key on your keyboard or click on “Activities” in the left upper corner of your screen. You can then use the search bar to find the program you’re looking for. double-clicking on it should start it up, and if you right-click on it you can add it to your “favorites” in the Activities list so you won’t have to search for it again in the future.
Changing your password
We will check that you’ve changed your passwords, and your group will receive or lose points depending on whether everyone in the group has changed their passwords.
Open a terminal window by double-clicking on the terminal program in
“Activities”. That terminal window should give you a prompt that will allow
you to run commands, such as:
whoamishould print out your usernamehostnameshould show you the name of the computer you’re sitting atdateshould show you the current date and time
There are bazillions of other commands, but we won’t go over them here. If you’re interested there are numerous good sources out there for learning more about Linux command line tools such as this tutorial and this video, or even old-fashioned things like books.
What we need to do right now, however, is change your password. Our CSci lab
systems use an entirely separate login system from the U’s other systems like
e-mail, so changing your password in the lab doesn’t have any impact on the U’s
system and vice versa. You can choose to (for now) have the same password
for both systems, but that’s not required and they won’t be kept in sync by
either of the systems. Do make an effort to choose a reasonably secure password.
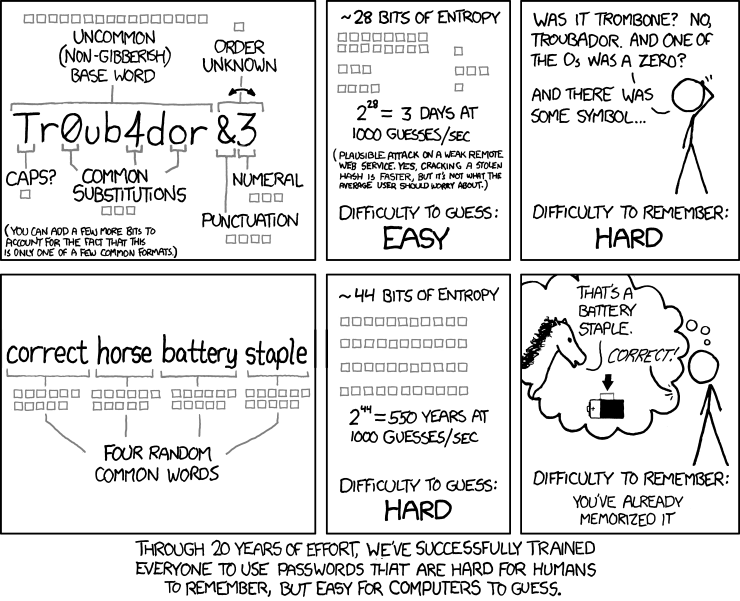
A fairly secure method of generating a password you can actually remember later
is to pick 4 unrelated words and run them together; an example (which you
shouldn’t use) might be setup-beggar-peony-federal.

To actually change your password type the command passwd.
You will be prompted to type in your
current password (the one following the pattern described in class) and then
the new password twice. For security reasons nothing shows on the
screen as you are typing your password. If you make a mistake, press
Ctrl-C to stop the process and start over.
Make sure to remember your new password, otherwise you won’t be able to log in next time you use the lab. We can reset your password, but we can’t ever tell you what your password actually is.
If you encounter any problems (such as your login not working), please let us know right away.
Get started in Racket
After everyone in your group has changed their password, it’s time to get started on the Racket part of the lab. One member of your group should be logged in, but it doesn’t really matter which. Whoever is logged in should open a browser, and then bring up this lab. (You can either get the URL from us, or login to Canvas and go through the link there.
Open some documentation
You should also open another few tabs with some bits of Racket documentation you’ll likely find useful as you work on the lab:
- The Racket “Beginning Student” language
- This includes documentation of all the functions provided in that version of
Racket, including
check-expectand things likemaxandgcdthat are part of exercises below.
- This includes documentation of all the functions provided in that version of
Racket, including
- The image library documentation
- This documents all the image manipulation and creation functions that you’ll need for some of the exercises below.
Organize your files (optional)
The picture of a file cabinet in Activities opens a window that lets you see and manipulate the files in your home space. If you wish, you can use this to create folders and subfolders help organize your files. You could, for example, create a “CSci1301” folder for the files you’ll generate in this course, or create a “Courses” folder and create “CSci1301” inside that.
Start DrRacket
If necessary, find DrRacket again (see above) and start it up.
You may also start DrRacket by double-clicking on a Racket file, including one you download such as example.rkt or one of the examples on Canvas.
Make sure language is set correctly
Make sure that the language is set to “Beginning student”. If it’s not, go to the “Language” menu and choose “Beginning Student”. Also, if you have troubles accessing image functions (in problem 3) then go to "Language -> Add Teachpack" and add "2htdp\image.rkt" from the middle column.
If you have accidentally added the teachpack from the first column, you
will be getting error messages when using image functions such as
rotate, either that the function definition is not found or that a
module has been imported twice. If this is happening, clear both
image.rkt teachpacks and then add the one in the middle column.
Start the lab
You will use a pair-programming approach: one person is a driver at the keyboard and type in program instructions; and the other person is a navigator and guides the driver by providing suggestions about what to type and what to do next. The roles should be switched every 10-15 minutes. For this lab it will be convenient to switch at the end of each exercise.
If you are working in a group of three, the roles are: a driver, a navigator, and a quality control person. Again, make sure to switch frequently.
Start your lab by typing a comment in the beginning of the file with the
lab number and the names (first and last) of all group members. Recall
that Racket comments are lines that start with ; (a semicolon).
In order to save a file go to “File -> Save
Definitions As…” and navigate to your folder. Make sure to save your
file with the extension .rkt. After you’ve done it once you can just
use “Save” (or Ctrl-S) to save the file.
The lab below will have several parts. You may do all your work in one file, or you may do different parts in different files, whichever you find more convenient. Make sure to submit all your files, however.
Problem 1: Infix to prefix conversion. (8 points)
Write Racket expressions that correspond to the given math expressions.
Check your answers by running the program, or, even better, by using
check-expect.
For instance, if are given 3 * (12/4 + 2), you rewrite it as a Racket
expression as (* 3 (+ (/ 12 4) 2)). Run it to check the answer, or,
better yet, figure out the answer before running the code, and use
check-expect to confirm your answer:
(check-expect (* 3 (+ (/ 12 4) 2)) 15)
Below are math expressions to write in Racket:
1.5 * 2 + 21/3(3 + 2 + 7)/(11 - 1 - 4)(3*(-2 +4))/(8/2 + sqrt(4))cos(0) + sin(0), wherecosandsinare the cosine and sine functions, respectively.cosandsinare both provided as functions in Racket; see the documentation for details.
Problem 2: testing Racket functions. (9 points)
Find out what the following Racket functions do by testing them on different arguments:
<=maxgcd
Questions you might explore include:
- What happens if a function is applied to more than two arguments? Fewer than two?
- What kinds of arguments are acceptable? Numbers? Strings? Booleans? Images?
Document your experiments and conclusions in your “.rkt” file. Include all of tests that you tried as you worked to determine what the function does. If you try an experiment that leads to an error, leave that experiment in your write-up, but put that expression in a comment so it doesn’t break things when you run your file.
Explain your findings in comments. You may read the function descriptions in the on-line documentation if you would like, but the descriptions of the functions that you submit.
Problem 3: creating a shape. (8 points)
Your task is to use functions in the
image.rkt teachpack
to create a particular shape. The on-line documentation for image.rkt should be useful.
The target shape is 200 pixels on each side and looks like this:

There are different ways of creating this shape. Some functions that you
may find helpful include:
square, triangle, right-triangle, rectangle, rhombus, rotate,
overlay, beside, and above.
Use variables as you find useful. For example, if you are using an image more than once, you might want to save it in a variable. Good use of variables is one of the criteria used for evaluating your work.
Do not use check-expect for images here.
check-expect can sometimes work for images,
but it tends to be very finicky and dependent
on the details of how an image is constructed.
As a consequence it’s common for two images that
look the same fail the check-expect test
because a few pixels are off by a wee bit.
Problem 4: explore Racket. (6 points)
Test three “what if” questions of your choice in Racket. For example,
you might want to try applying the + function to strings. Write down what
you think is going to happen, test it, and write down if that was what
you expected. If an expression that you test results in an error,
comment it out before you move on to the next one so it won’t break things
when you (or we) run your file.
Originally written by @elenam, with subsequent modifications by @NicMcPhee